
Uploading Your Voter List
Last updated August 25, 2026
This guide walks you through uploading your voter list — choosing your file, mapping columns to the right data types, setting filters, and managing voters throughout the election.
View Transcript
[0:00]: Welcome to Ballot Bites. Today's topic is uploading your voter list. There are two ways to upload your voters. From the dashboard, click "Upload voters" here, or from the left navigation menu, navigate to "Voters" and on the far right, you'll also see "Upload voters." You'll choose your file and upload that file.
[0:25]: A status bar and helpful instructions are located at the top. First, you'll confirm which fields and columns you'd like to include. It will default your header row. Member ID is not required. However, if you choose to upload member IDs, each member ID must be unique and every record must contain a value. No blank member ID fields. You can ignore data, columns, or rows that are not needed; it will gray out that information. The data you see here is only a preview of your first 10 records. Once the upload is fully completed, you will be able to view all members within Snap Ballot and can review or edit them from the voters page throughout the voting period. Now you'll click "Continue to column configuration."
[1:19]: It will show that the upload was successful. You can X that out.
[1:25]: Now you'll map each column to the appropriate data type. Your progress is noted at the top, and again, some helpful tips. Member ID looks good. First name is mapped correctly. Last name—we're going to change that so it matches. We've got email.
[1:48]: For region, we're going to change this one to "Group or type." Group or type can be used for filtering later. Other fields can also be used as filters. For example, a region filter makes sure only the people who live in a certain area get to vote for the leaders of that area. So, if there's an election for a West region director, only members who live in the West region will see that race on their ballot. Filters can vary by your organization's voting requirements, and you can have multiple filters for items on your ballot.
[2:21]: So here in status, we're also going to map that one to group or type. State is mapped correctly. Vote weight is also mapped correctly. And for phone number, we're going to go ahead and select "Other." If at any time you need to start over, you can click "Delete and start over" here. However, if everything looks good, click "Save column mappings" and then "Create voters."
[2:53]: The green bar will show "Voters created," and again you can click that out. The upload summary will show how many rows of data and how many columns you uploaded, and if there are any issues with your database. To correct errors, simply click the voters page here. It will show that we have two issues here, so we're going to show issues.
[3:16]: You can see Taylor needs an email correction. So, we're going to edit that. And Jordan Johnson has no email. Adding an email address ensures they will receive the email invitation to vote. So, we'll want to add this and then click "Save."
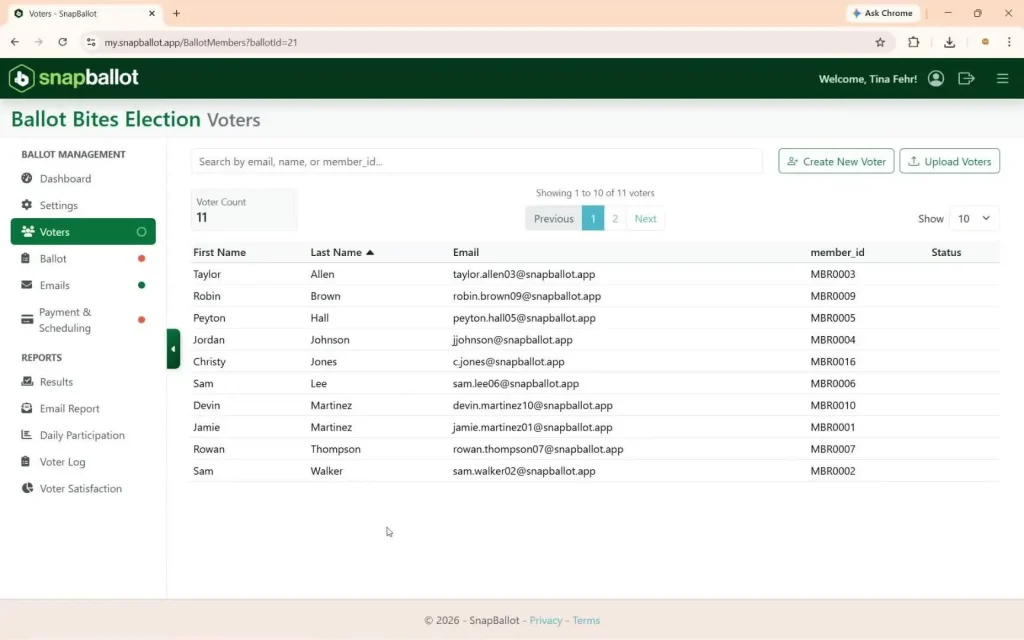
[3:39]: Once your voters are loaded, total voter count is shown here on the left. The list of voters will show 10 names at a time by default. You can view voters with the menu bar in the center by clicking "Next." You can also easily change how many voters you see at a time with this drop-down here. Additionally, you can also search voters by name in the search bar.
[4:07]: If you realize you have a member you may have missed, you can easily create voters one at a time. Just go here to "Create new voter," populate that information, making sure to include that required member ID, and then click "Create."
[4:25]: You can also add or edit voters from the dashboard here any time throughout the voting period. Now your voters are all set. Thanks for watching. Grab another bite in our series of helpful tips at any time.
Upload your file
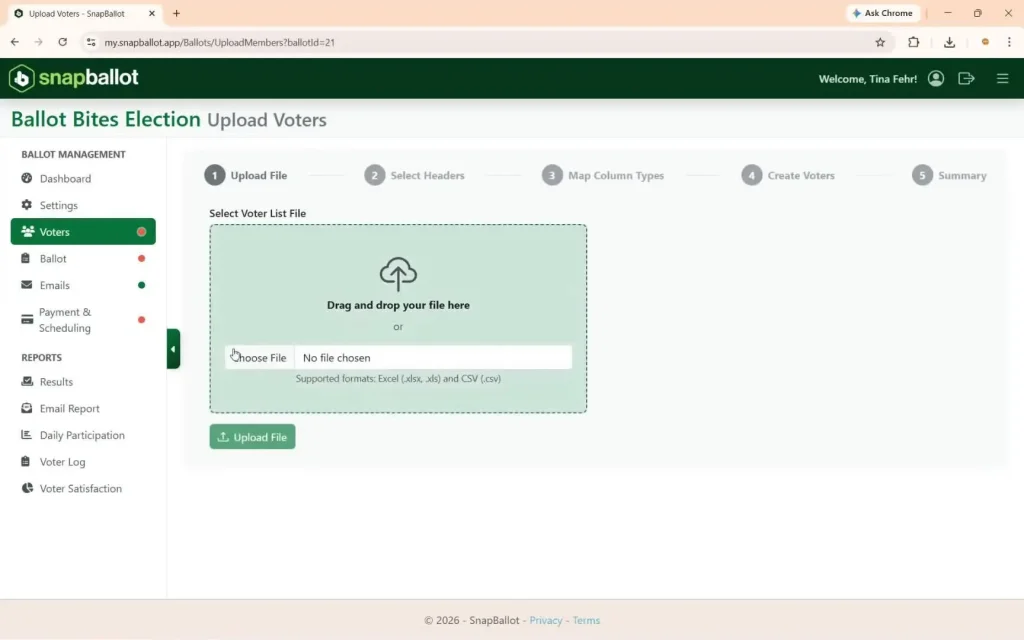
- From the dashboard, click Upload Voters — or go to Voters in the left menu and select Upload Voters on the far right.
- Select your voter list file to upload. A status bar and helpful instructions appear at the top.
Confirm fields and columns
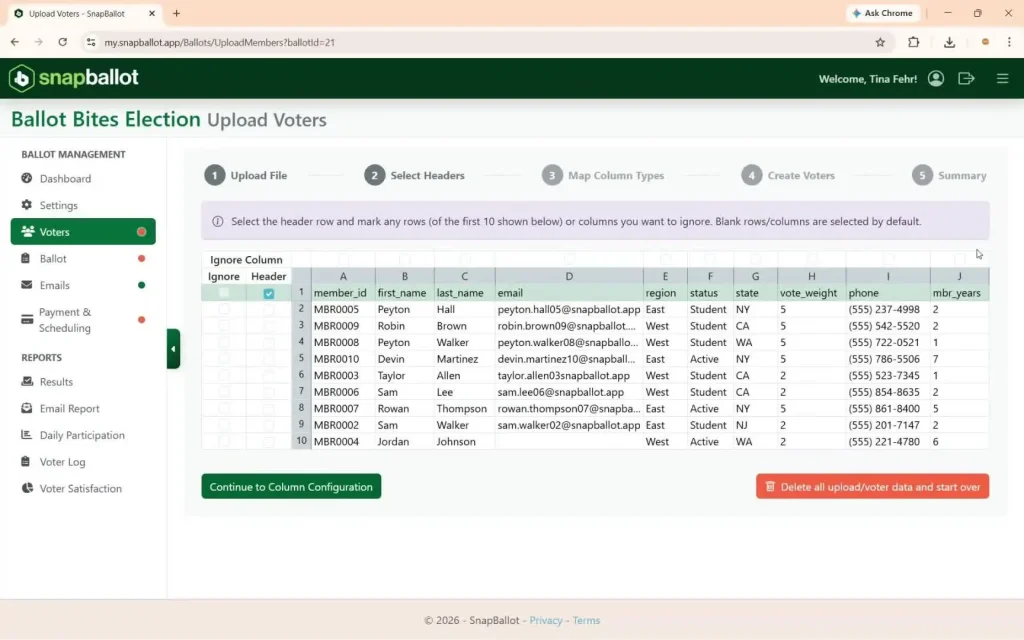
- Confirm which fields and columns to include. This defaults to your header row.
- You can ignore unnecessary columns or rows — they will be grayed out.
Note: Member ID is not required. If you choose to include it, each ID must be unique and contain a value with no blanks. The preview shows only the first 10 records.
When you're ready, click Continue to Column Configuration and confirm the upload was successful.
Map columns and set filters
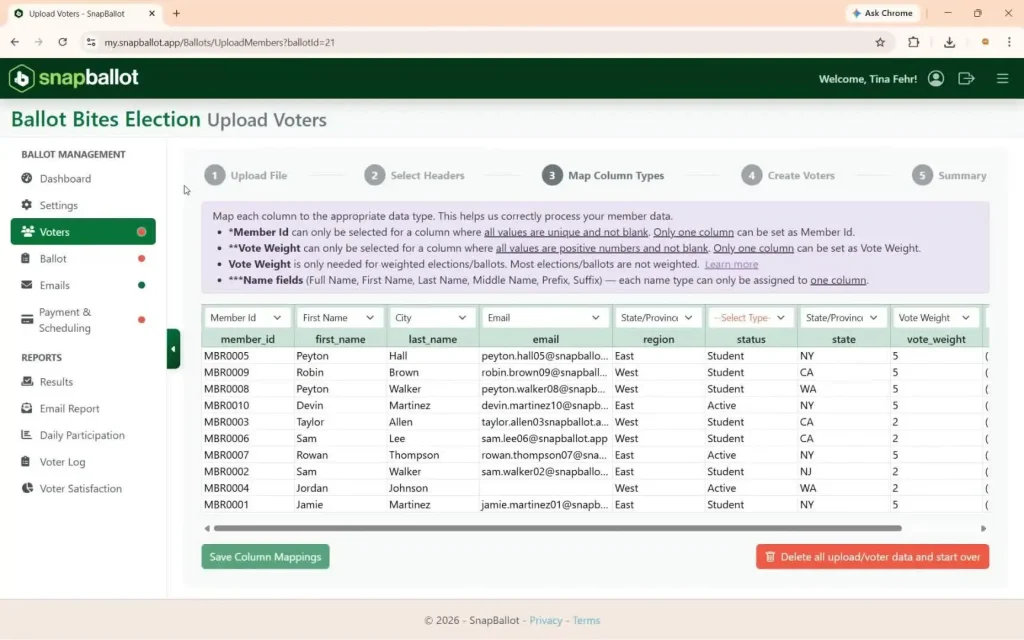
- Map each column to the appropriate data type.
- Use fields like Region to filter voters by location.
- Multiple filters can be set according to your organization's voting requirements.
Create your voters
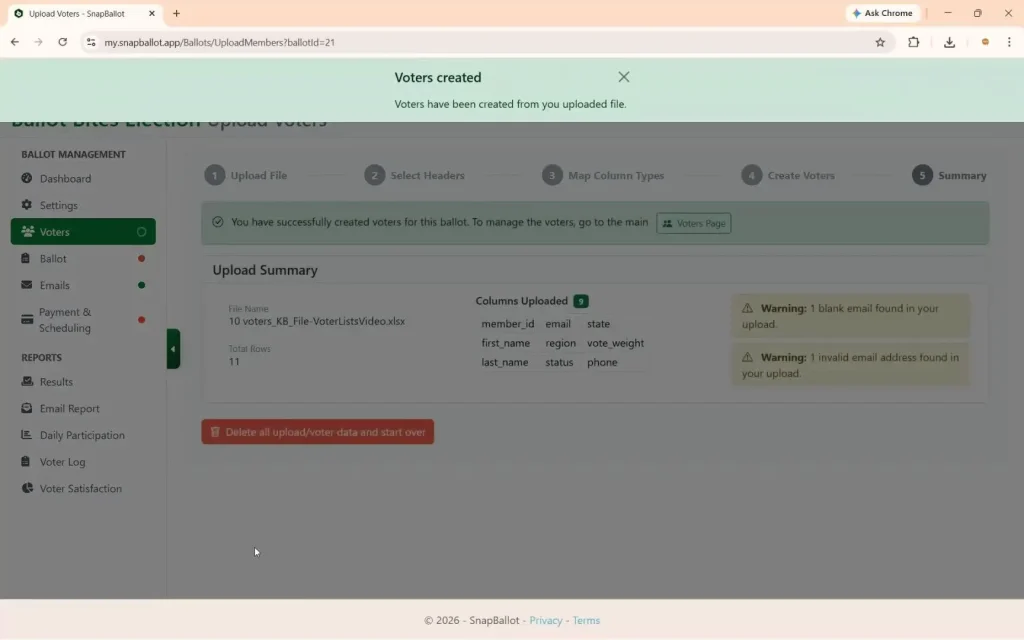
- If everything looks good, click Save Column Mappings, then Create Voters.
- A green bar will confirm that voters have been created.
- Check the upload summary for the number of rows and columns uploaded.
Review and manage voters
- Correct any errors, such as missing email addresses, so voters receive their invitations.
- The total voter count is displayed on the left. View voters 10 at a time, or adjust the display settings.
- Use the search bar to find specific voters by name.
- To add someone manually, click Create New Voter and fill in the required information.
- You can add or edit voters from the dashboard at any time during the voting period.



Related articles
Building Your Ballot
How to build your ballot — creating ballot items, adding candidates and biographies, setting voting rules and rotation, filtering by…
Email Set Up & The Email Report
Learn how to set up election emails in SnapBallot, including invitations, confirmations, reminders, and how to review email delivery reports.
SnapBallot Overview
A step-by-step overview of setting up an election in SnapBallot — from creating a ballot and uploading voters to configuring…

Track Voting Participation in Real Time
See how many members have voted while your election is open. The Daily Participation report updates in real time so…
From The Blog
Checklist: Preparing for Your Next HOA Election
Planning will help you run a successful, problem-free HOA election. Follow this checklist to confidently plan every stage of the…
Common Questions About Electronic Voting Systems for HOAs
Get answers to the most common questions about HOA electronic voting systems, including legality, security, compliance, accessibility, and homeowner adoption.

HOA Voting Trends: What Board Members Should Know
Discover the top HOA voting trends shaping 2026, including digital and hybrid elections, new voting laws, mobile-first experiences, stronger security,…